The desired method of analysis to be used can be selected in the Combobox "Analysis Method."
|
Method of Analysis |
Standard |
Info |
|
Local work protection |
EC Directive 2003/10/EC Accident Prevention Regulation "Lärm" BGV B3 (from German Employer's Liability Insurance Association) DIN 45645-2 |
Evaluated levels: LAeq, LAIeq, LCeq, LCpeak |
|
Personal work protection |
EC Directive 2003/10/EC Accident Prevention Regulation "Lärm" BGV B3 (from German Employer's Liability Insurance Association) DIN 45645-2 |
Evaluated levels LAeq, LAIeq, LCeq, LCpeak
|
|
Whole-Body vibrations |
EC-Directive 2002/44/EC EN ISO 8041 VDI 2057-1 |
X- and Y-direction: Frequency weighting wd, amplitude weighting 1
Z-direction: Frequency weighting wk, amplitude weighting1,4 |
|
Hand-Arm vibrations |
EC-Directive 2002/44/EC EN ISO 8041 VDI 2057-2 |
X-, Y- and Z-direction: Frequency weighting wh, amplitude weighting1 |
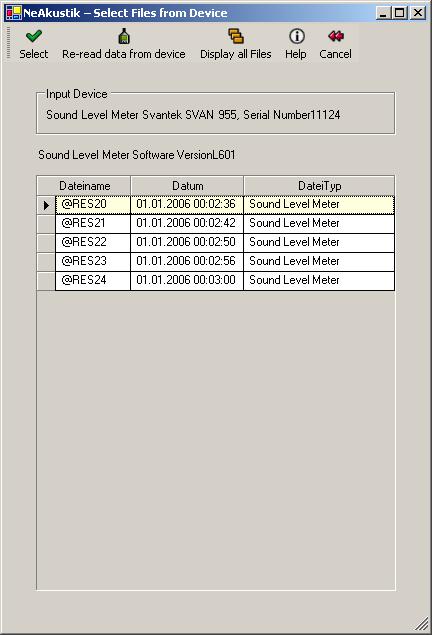
Click on the button "Measurement read from...." A dialogue will appear in which the measurement files from level meter with their corresponding level information are listed, in which you can select the measurements you want to read in.
Please note:
Using multichannel level meters, more than one measurement may be contained in one file:
For each sound level channel one separate measurement is created.
For vibration channels separate measurement are created for each frequency weighting group matching.
Only these measurements are shown, that fit to the method of analysis selected. Klick on 'Display all files' if you want to see information about files not displayed.
If there are vibration measurements, you may specify, which of the input channels belongs to the X-, Y-, or Z-axis.
Select the desired measurements by clicking on the corresponding row in the table.
By holding the keys "Ctrl" or "Shift" several measurements can be selected at once, (see thereto Multiple selection of Files.)
Click "Select", in order to add the data to the project. The data will then be inserted.
If all files present in the device are to be displayed, (e.g. Setup files, VLM files, log files etc..,) then click the button "Display all Files." Then a dialogue will appear in which all files are listed.
If you want to re-read in the files from the level meter then click the button "Re-read data from device."
If you click in the grey field on the left beside the file name in the table the measurement-info dialogue will appear. All results of the measurement are listed in the dialogue (see chapter "View Measurement Information"), further actions which would otherwise be found in the menu, can be accomplished with a right mouse-click on a row).
In principle data can only be read in from one level meter at a time.
Measurements from other projects stored on a hard drive can also be added to a project.
For this purpose click the button "Read measurement from file." A file selection dialogue will appear. Measurements from previously saved projects (* .nem) as well measurements from Svantek files (* svn) can be read in.
By holding the keys "Ctrl" or "Shift" several measurements can be selected at once, (see thereto Multiple selection of Files.)
Measurements from a project can be deleted by marking the relevant measurements (click the row in the table and if necessary hold the keys "Ctrl" or "Shift", see thereto Multiple selection of Files ) and finally press the "Del" key.
A right-click on a row in the table opens a context menu which likewise makes measurement deletion possible.
The measurements can be also deleted by marking them in the table and then clicking on the menu option "Process - Delete selected Measurements."
All measurements in a project can be deleted by clicking on the menu option "Process - Delete all Measurements."
If you click the window "Read measurement from file" or if you click in the main window in the grey field on the left beside the file name in the table the measurement-info dialogue will appear displaying all results of the measurement.
This dialogue contains different information, depending on the type of measurement (sound or vibration).

Comments regarding the measurement can be processed here. Comments stated in the measurement device respectively the comments that were entered in this dialogue will be displayed.
Projects include a large amount of information which can either be entered or processed by clicking the button "Process" or the menu option "Process - Edit Project Info."
The following window will be displayed
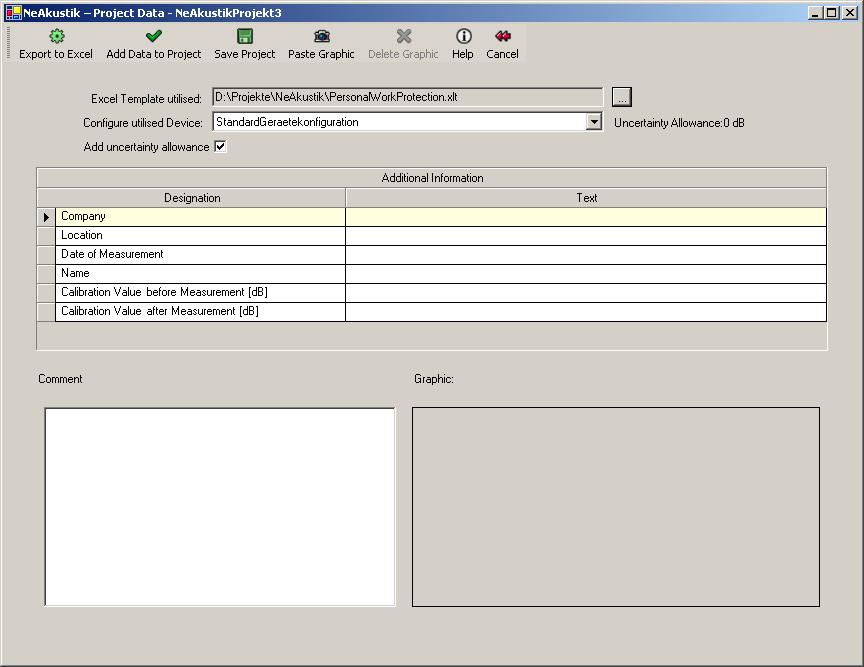
The Button "Export to Excel" is not visible when the dialogue "Process - Edit Project Info" is selected.
Excel Templates will be displayed in Properties for the respective evaluation of predefined Excel Templates. If you wish to use a different template this can be done with the help of the button "..." Select a different Excel Template (* xlt).
In the Combobox "Utilised Device Configuration" the standard configuration has been preselected under Settings. Under device configuration the devices used for the measurement are described. The device configuration should be noted in the measurement report.
The device configuration is saved together with the project. If a project is opened that has a configuration that no longer corresponds to the selected standard configuration. The Combobox will display the configuration "from project:..."
See the chapter "Settings" for the definition of device configuration.
Graphics that were inserted during the evaluation can be added to a project. For this purpose click the button "Insert Graphic" and select the relevant graphic. The selected graphic will be displayed in the corresponding frame. The graphic can later be deleted from the project by clicking on the button "Delete Graphic." If no graphic is designated for the selected Excel Template than this will be displayed in the upper part of the graphic.
Additionally longer comments can be entered in the project.
By clicking on the button "Add Data to Project" all data in the project directory Verzeichnis, in dem alle Dateien, die zu einem Projekt gehören, abgespeichert werden will be saved.
By clicking on the button "Export to Excel" the project will be saved and evaluated. It may take a few moments to save the dialogue. As soon as the evaluation is saved it will be displayed as an Excel spreadsheet.
For the output and the calculation formula: it has been entered in the project dialogue that the uncertainty allowance should be added. The uncertainty allowance will be added according to the accuracy level of the level meter for all level measurements.